Blog
How to Choose Outdoor Privacy Screening for Australian Backyards (Without Blocking Breezes)

Australian backyards cop a bit of everything: harsh UV, sudden summer storms, salty coastal air (for some), and the classic “my neighbour’s new window looks straight into our patio” problem. Privacy screening — especially when you use the right wall panels — can fix overlooking fast, but the wrong choice can also make your outdoor area feel boxed in, dim, and strangely stuffy.
The goal isn’t to turn your alfresco into a bunker. It’s to control sightlines while keeping airflow doing what it does best: cooling you down.
This guide walks you through an airflow-first way to choose screening, where to place it, and which options suit common Aussie backyard layouts. Along the way, we’ll connect the dots to pergola setups and wall-panel style solutions (without turning this into a sales brochure).
Start with the two things you’re actually trying to control
Most people say they want “privacy”, but there are usually two (sometimes three) separate problems.
1) Overlooking (sightlines)
This is the “I can see them, they can see me” issue. It might be:
• a neighbour’s kitchen window
• a second-storey balcony
• a raised deck next door
• a side path with foot traffic
• a new build that suddenly changed your backyard exposure
2) Wind and comfort
Sometimes you want privacy and a calmer seating area, but you still need airflow so the space doesn’t feel hot and stagnant in summer.
3) Glare and low-angle sun (bonus problem)
If late arvo sun blasts across the patio, you’ll naturally reach for something solid. But solid is also what kills the breeze—so this is where “permeable” or adjustable screening shines.
A practical question to anchor everything
Ask yourself: “Do I need block-out all the time, or only at certain times and angles?”
If you only need privacy sometimes, adjustable screening can be the difference between comfort and an always-closed space.
A simple airflow-first framework for choosing screening
Instead of starting with products, start with these four decisions. It’ll save you money and regret.
Decision 1: How much “see-through” can you tolerate?
Think in three levels:
• Light screening (you still see shapes and movement)
Good for: side boundaries, casual privacy, keeping a very open feel.
• Medium screening (breaks clear sightlines, still airy)
Good for: most patios and pergola areas where you want privacy but not darkness.
• High screening (near block-out)
Good for: direct overlooking from close neighbours, high-traffic side paths, or when you need strong glare reduction.
Here’s the key: medium screening is often the sweet spot for Aussie backyards because it protects privacy while still letting breezes pass.
Decision 2: Do you need airflow through the screen itself?
Airflow isn’t just about “gaps”. It’s also about not creating a big, flat wall that forces wind to whip around edges.
If your area gets breezy, you’ll generally want one (or more) of these traits:
• slats/battens with deliberate spacing
• perforated or mesh-style panels
• angled louvre-style elements
• screens that can open/slide so airflow can be tuned
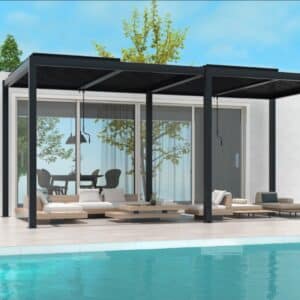
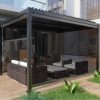
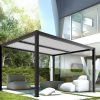
Decision 3: Is it a boundary screen or a “room maker”?
Boundary screens are usually about sightlines across a fence line. “Room maker” screens create a sheltered corner under or beside a pergola (think outdoor dining nook or lounge zone).
Room-making is where wall-style screening (including panel systems) becomes especially useful because it creates structure without needing full enclosure.
Decision 4: Are you choosing for looks, maintenance, or longevity?
Most people want all three, but you’ll usually prioritise one:
• Looks-first: timber battens, greenery, decorative screens
• Low-maintenance: powder-coated aluminium, composite, quality outdoor fabrics
• Longevity (especially coast): corrosion-resistant materials and fixings, easy cleaning, fewer moisture traps
Work out your “breeze map” before you commit
You don’t need to be a weather nerd. Just do this once:
• Sit in your outdoor area on a warm day and notice where the breeze comes from
• Check whether it’s blocked by the house, garage, fencing, or a neighbour’s structure
• Identify the “inlet” side (where air enters) and the “outlet” side (where it leaves)
A common mistake is putting the most solid screening right on the inlet side. That’s how you end up with privacy… and a dead, hot pocket of air.
Quick test
If you already have a shade umbrella, move it around and see how it changes airflow. If a single umbrella can noticeably disrupt the breeze, a solid privacy wall definitely can.
The smartest placement strategy: offset, don’t suffocate
If your seating area is under a pergola, you often don’t need a full-length “wall” on the edge. You can place a screening like a windbreak that still lets air move around and above it.
Try these placement patterns:
Pattern A: Partial-height screening near seated eye level
You block the view line while keeping airflow above. This works well when the overlooking is from ground level (neighbour in their yard, side path traffic).
Pattern B: Offset panels (create a zig-zag line)
Instead of a straight wall, stagger sections. This breaks sightlines while allowing airflow to move through the gaps and around the edges more gently.
Pattern C: Two-zone screening
Use stronger screening at the most exposed corner, lighter screening elsewhere. Most backyards don’t have equal exposure on all sides.
Pattern D: Adjustable + fixed combo
Fixed screening for the “always exposed” area, and adjustable screening for glare or occasional privacy needs. This is often the most livable approach.
Screening options that keep breezes (and when they make sense)
Below are the most common privacy screening types used around patios and pergolas—rated through the lens of airflow, privacy, upkeep, and Aussie conditions.
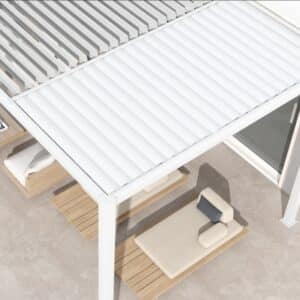
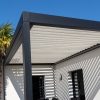
Slatted battens (timber or aluminium)
Why people like them:
• modern look
• great for medium privacy
• airflow-friendly when spaced well
• can be used as feature walls around pergolas
Watch-outs:
• timber needs upkeep (sealing, checking for movement, warping)
• spacing is everything—too tight, and you lose breeze; too wide, and you lose privacy
Best for:
• suburban backyards with close neighbours
• side boundaries that need privacy without a “fence extension” vibe
• pergola zones where you want structure but not enclosure
Perforated or decorative screens
Why people like them:
• strong visual privacy without total block-out
• good airflow through perforations
• can look architectural, especially as a divider near a pergola
Watch-outs:
• some designs create glare or patterned shadows (can be a plus or a minus)
• cleaning: dust and pollen can sit in cut-outs over time
Best for:
• screening a specific angle (like a neighbour’s window line)
• creating a “backdrop” behind a BBQ or dining setting
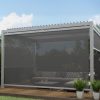
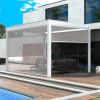
Outdoor blinds and shade screens (fabric)
Why people like them:
• adjustable
• great for low-angle sun and glare
• can be rolled up to maximise airflow
Watch-outs:
• wind exposure matters—quality hardware is essential
• Salt air and UV can shorten the lifespan if the fabric isn’t suited to your conditions
• can flap and create noise if not tensioned properly
Best for:
• patios that need glare control
• renters or homeowners wanting the most flexible option
• spaces where you want privacy sometimes, not always
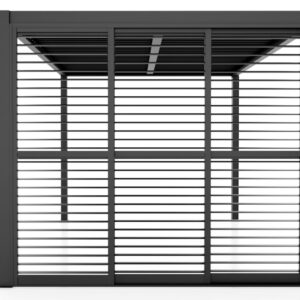
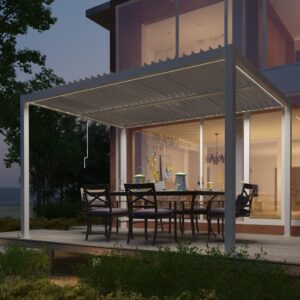
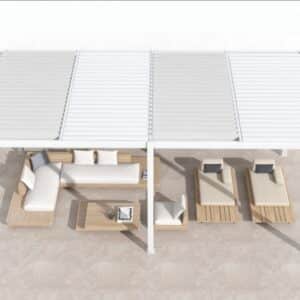
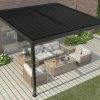
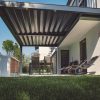
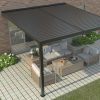
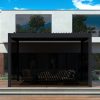
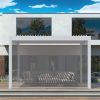
Wall-style screening and panel systems (including louvre-style and sliding formats)
This is where pergola privacy often levels up from “screen” to “outdoor room”.
Why people like them:
• can create a true outdoor room feel
• can be designed for privacy while still allowing airflow (especially with louvre-style designs)
• sliding formats can open the space when you want maximum breeze, then close for privacy/glare
• strong, clean look that suits contemporary Aussie homes
Watch-outs:
• installation quality matters for long-term performance (alignment, fixings, movement)
• You need to consider wind loads and where panels are anchored
• tracks and moving parts need occasional cleaning, especially in dusty or coastal areas
If you’re exploring wall-panel style screening around a pergola, it helps to start by looking at systems designed for outdoor durability and adjustability—this is where quality wall panels for pergolas can be a useful reference point for what’s possible.
Choose materials with Australian conditions in mind
A privacy screen that looks great in a showroom can age fast in the wrong environment.
Coastal suburbs (salt air)
Salt speeds up corrosion, especially on low-quality fixings and some steel components. In coastal areas, prioritise:
• corrosion-resistant fixings
• powder-coated aluminium or similarly durable materials
• designs that don’t trap salty moisture in crevices
• easy-to-rinse surfaces
High UV and heat
Australia’s UV is no joke. Look for:
• UV-stable finishes
• colours and coatings designed for exterior use
• materials that don’t become brittle quickly
• fabrics rated for outdoor exposure (if using blinds)
Humid or leafy areas
If you’ve got lots of shade trees, humidity, or morning dew:
• avoid designs with lots of moisture traps
• plan for easy cleaning (pollen and leaf debris)
• ensure air can move behind/around the screen to reduce mould growth
Don’t ignore approvals and boundary rules
Rules vary by state, council, and by whether the screen is considered exempt development, part of a fence, or attached to a structure. The safest approach is:
• check your local council guidance first
• confirm height limits and boundary requirements
• consider neighbour relations early (especially if you’re increasing height near a shared boundary)
For an example of the kind of guidance you’ll see (and the reminder that requirements vary), the NSW Government has Planning Portal guidance on privacy screens here: Planning Portal guidance on privacy screens
Make pergola privacy feel open: design tips that actually work
Privacy around pergolas is a sweet spot because you can treat screening like walls of a room, without fully enclosing it.
Use “corner privacy” first
If overlooking hits from one direction, screen the corner where people sit the most. You often don’t need to screen the whole side.
Keep a high line of airflow
Even when you want strong privacy, try to avoid a floor-to-ceiling solid block-out across the entire length. Allow:
• airflow above seated height
• openings or adjustable sections
• breathing space at the top or sides where appropriate
Match screening to how you use the space
Ask:
• Is this a dining zone (people sit longer, want comfort)?
• Is it a BBQ zone (smoke and airflow matter)?
• Is it a pool-adjacent zone (splash, chlorine, and cleaning matter)?
Think about noise, too
Screens can reduce the feeling of being “on display”, but they can also reflect sound back into the space if they’re very solid. Permeable or textured screening often feels more comfortable acoustically.
If you’re designing around a pergola and want privacy that still feels airy, it can help to review a few real-world configurations and layouts first—have a look at find wall panel options for Australian homes to see how adjustable screening can be used to zone spaces without permanently closing them in.
A quick measuring method (so you don’t overscreen)
You can do this with a mate and a phone.
- Have your mate stand at the overlooking point (neighbour’s window line, deck edge, side path)
- Sit where you actually spend time (outdoor dining chair, lounge seat)
- Take a photo from the overlooking point aimed at your seating area
- Mark the area of exposure: which parts of your seating area are visible?
Now you can screen precisely, instead of building a giant wall you don’t need.
Installation and maintenance realities (especially for moving screens)
Even if you’re not installing it yourself, understanding what matters helps you choose better.
If it slides or moves, keep it clean
Tracks and guides collect:
• dust
• leaf litter
• sand (especially near the coast)
A quick clean on a routine schedule prevents sticking and uneven wear.
Wind loads are real
Large panels can catch the wind like a sail. If your backyard gets strong gusts, you’ll want:
• robust anchoring points
• correct fixings for your structure (timber vs steel vs masonry)
• a design that allows wind to pass through, rather than fighting it
Ask about finish durability
For metal screening, the coating and prep work matter. A good finish will look better for longer and is easier to clean.
If you’re considering a panelled setup around a pergola, it’s worth understanding what good fit and alignment look like (especially for anything that slides or adjusts), and wall panels installation for pergolas gives a practical starting point for exploring systems built for outdoor use.
Common backyard scenarios (and what usually works)
Narrow-lot suburban backyard with close neighbours
Typical needs:
• privacy at seated height
• keep airflow because backyards can feel still and warm
Good fit:
• slatted battens (medium spacing)
• perforated panels as targeted dividers
• adjustable louvre-style screening for corner zones
Coastal backyard with wind and salt exposure
Typical needs:
• wind moderation without total block
• corrosion resistance
Good fit:
• powder-coated aluminium screening
• permeable designs that don’t act like a sail
• avoid high-maintenance timber in exposed positions unless you’re committed to upkeep
Overlooked patio from a neighbour’s second storey
Typical needs:
• block an elevated sightline
• avoid making the patio dark
Good fit:
• targeted higher screening in the specific line of sight (not the whole boundary)
• pergola-side screening that acts like a privacy wall near seating
• consider layering: partial solid + permeable upper section
Patio that’s private, but blasted by afternoon sun
Typical needs:
• glare reduction
• adjustable control
Good fit:
• outdoor blinds/shade screens that can retract
• louvre-style or sliding screening that can close at low sun angles and open for airflow later
Final checks before you choose
Run through this quick checklist:
• Have I identified the exact sightline I need to block?
• Do I need privacy all the time, or only at certain times/angles?
• Where does the breeze come from, and am I about to block it?
• Do I want light screening, medium screening, or near block-out?
• Is my backyard coastal, high UV, or high humidity (materials matter)?
• Will the screen need cleaning/maintenance that I’ll actually do?
• Do I need to check approvals or height rules for my area?
FAQs
What’s the most low-maintenance outdoor privacy screening in Australia?
Generally, powder-coated aluminium and well-designed perforated or louvre-style screening are low-maintenance compared with timber or plant-only solutions. The key is choosing a finish suited to outdoor UV and (if relevant) coastal exposure, and keeping surfaces and tracks clean.
Are privacy screens better than planting a hedge?
They solve different problems. Screens are immediate and precise for sightlines. Hedges are natural and can look beautiful, but take time and ongoing trimming. Many Australian backyards do best with a hybrid: a structural screen for instant privacy plus greenery to soften it.
How do I keep airflow if I need strong privacy?
Use permeability and smart placement. Instead of a fully solid wall, consider slats with spacing, perforated panels, or adjustable louvre-style screening. Also, avoid blocking the main inlet side where breezes enter your patio.
Will screening make my patio hotter?
It can—if it blocks breezes and light in the wrong way. Airflow-friendly screening (medium privacy, permeable designs, adjustable options) usually prevents the stuffy box effect while still giving privacy.